5bei.cn大模型教程网
前言🤗
今天带大家一起来读AquaLoRA这篇论文(ICML 2024)的实现代码,本文首先回顾方法思想、然后在服务器上复现实验、接着详细解读代码,而后与大家分享一下我的学习收获,最后进行总结。
一、方法回顾😊
本节主要用较为凝练的语言,对AquaLoRA方法进行概述。如果大家想要详细了解这篇论文的核心思想和创新点,请移步至论文精读部分!👇论文精读-AquaLoRA: Toward White-box Protection for Customized Stable Diffusion Models via Watermark LoRA-CSDN博客

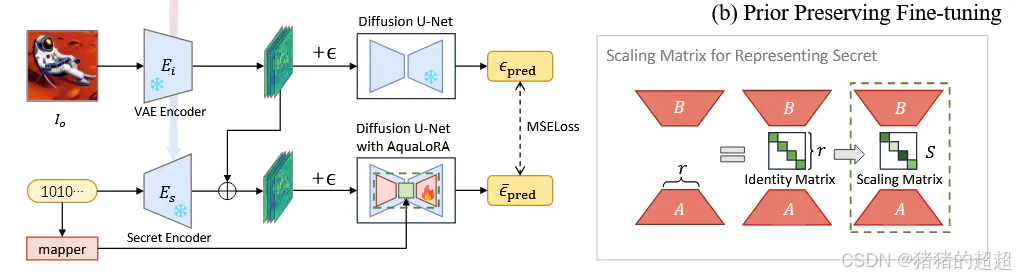
上图为本文的算法框架,分为两阶段进行训练。
第一阶段:基于BCELoss、LPIPSLoss和PRVLLoss三项损失加权进行优化,训练出水印编码器和解码器,用于第二阶段训练。
第二阶段:基于先验保留微调算法,对扩散模型预测噪声设计L2损失函数(原始扩散模型与微调后水印扩散模型之间的噪声平方差),而水印信息作为A×S×B的LoRA矩阵嵌入到扩散模型权重中。
论文的主要创新点在于第一阶段提出了PRVL损失函数(较好消除局部伪影)、第二阶段的先验保留微调算法(基于LoRA微调改的)以及额外的鲁棒性增强训练算法。
(注意:本博客主要讨论框图中的算法,即第一二阶段的训练,而不讨论论文提出的额外训练)
二、实验复现👨🏻💻
2.1 环境搭建
训练所需的显卡显存在40GB左右,大家可以去autodl、矩池云、UCloud等平台按机时租。
这篇论文提供的python环境非常好搭建,requirements.txt也是简洁明了👏
按照README在终端命令行操作即可(注意,python版本一定要3.10,其他版本似乎会有问题)
git clone https://github.com/Georgefwt/AquaLoRA.git
cd AquaLoRA
conda create -n aqualora python=3.10
conda activate aqualora
pip install -r requirements.txt
如果服务器连不上Github,pip install -r requirements.txt 这步可能会卡死,那需要注释requirements.txt 中的第3行:
# git+https://github.com/openai/CLIP.git① 先运行:pip install -r requirements.txt
② 接着从Github上下载https://github.com/openai/CLIP.git到本地,拖到服务器上
③ cd到CLIP文件夹里面,运行python setup.py,即可离线安装好clip相关的python包。
2.2 模型训练
数据集需要大家自行下载一下,包括COCO 2017test和Gustavosta-sample,在这不再过多赘述。
需要进行两阶段的训练,第一阶段训练水印编/解码器,第二阶段训练得到扩散模型的水印LoRA。
2.2.1 第一阶段训练
第一阶段使用1w张COCO 2017test中的图文对,应该是不需要修改什么参数,在第三部分,将和大家介绍相关的参数。
注意,数据集的路径,作者在README上写得不太对,应该是下面这样:
COCO2017test
├── 000000000071.jpg
├── other jpgs...
└── metadata.jsonl
然后依次在终端运行下面指令,即可跑起来第一阶段的训练:
cd train
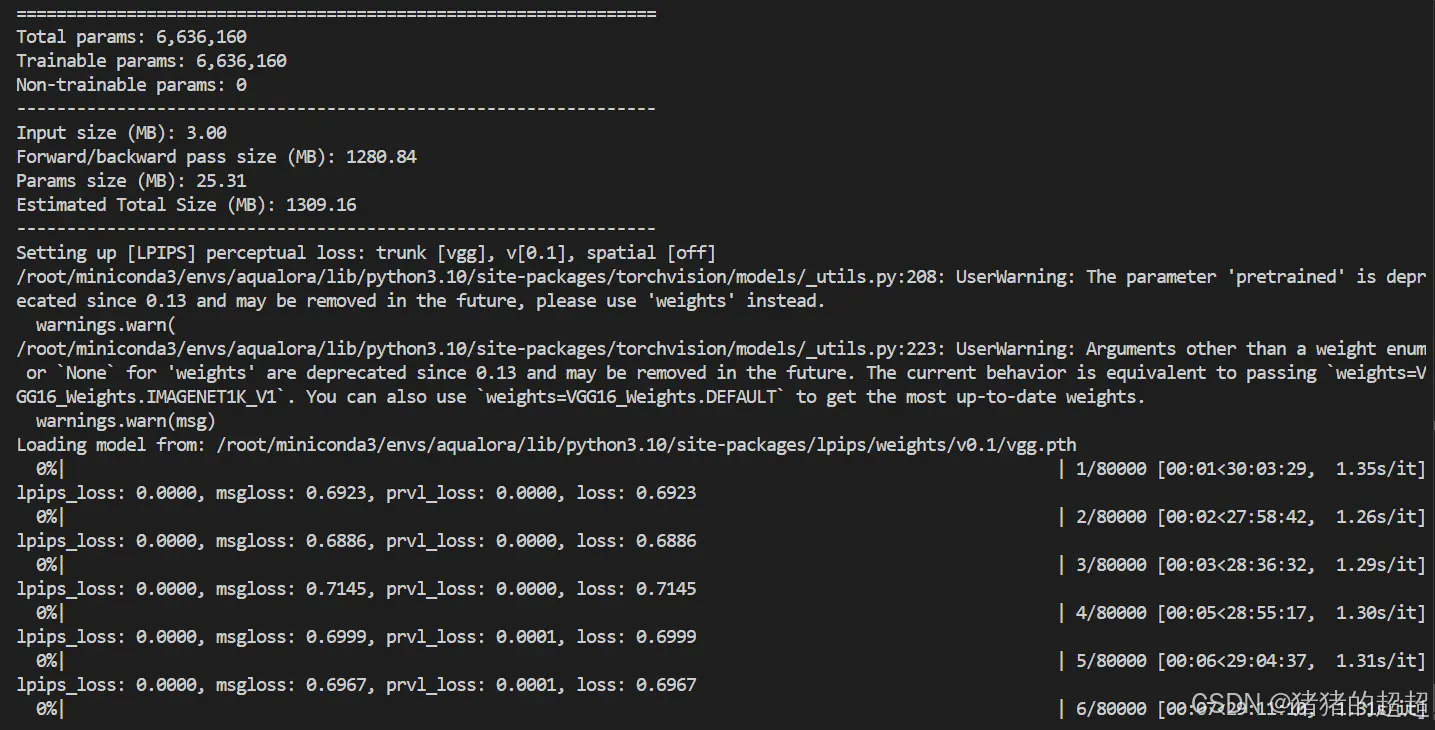
python latent_wm_pretrain.py --output_dir output1 --epochs 40 --dataset COCO2017test一开始代码会自动下载stable diffusion-v1.5(基础模型)、efficientnet_b1_rwightman-533bc792.pth(水印解码器基于此微调)和vgg16-397923af.pth(LPIPS损失函数需要)。
训练过程如下,训练40个epoch大概需要近30小时。
2.2.2 第二阶段训练
第二阶段使用1w张Gustavosta-sample提示词生成的图片。基于前面阶段训练好的水印编码器和解码器,进行水印LoRA的训练。在train文件夹下,运行下面指令:
(注意修改相应参数,比如路径,主要是MODEL_NAME、TRAIN_DIR和start_from_pretrain,如果显存不够,可能还需要减小train_batch_size)
export MODEL_NAME="runwayml/stable-diffusion-v1-5"
export TRAIN_DIR="Gustavosta-sample"

accelerate launch --mixed_precision="fp16" ppft_train.py
  --pretrained_model_name_or_path=$MODEL_NAME
  --train_data_dir=$TRAIN_DIR --caption_column="text"
  --resolution=512
  --dataloader_num_workers=12
  --train_batch_size=12
  --num_train_epochs=30 --checkpointing_steps=1000
  --learning_rate=1e-04 --lr_scheduler="cosine_with_restarts" --lr_warmup_steps=0 --lr_end=0.01
  --seed=2048
  --output_dir="output2"
  --start_from_pretrain="pretained_latentwm.pth"
  --validation_prompt="A portrait of a young white woman, masterpiece"
  --validation_epochs=1
  --rank=320
  --msg_bits=48
应该就能跑起来了,如下所示:

2.3.3 tensorboard
大家可以找到输出目录下的logs文件夹,然后运行下面指令,查看训练中损失和精度的变化情况:
tensorboard --logdir=. --host 0.0.0.0 --port 60062.3 模型评估
这块参考README即可,注意可能需要下载一些预训练模型。
在水印解码准确率评估中,需要下载stable diffusionv2作为重构攻击的模型。
在生成图像质量评估中,fid和dreamsim均需要下载预训练模型来定量计算图像质量。
先需要读者指定一个水印比特串,作为水印LoRA嵌入到扩散模型中,便于后续模型评估:
cd scripts
python create_wm_lora.py --train_folder  --hidinfo "1010..." (when hidinfo is none, script will chose a random bit string)
2.3.1 水印解码准确率评估
主要为两个代码,分别是run_eval_base.py和run_eval_distortion.py,分别评估无图像攻击和有图像攻击或扰动情况下的水印解码准确率,分析该水印方法的嵌入效果和对各类扰动的鲁棒性。
其主要指标为bitAccuracy和TPR@FPR。
# 无图像攻击下的水印准确率评估
python run_eval_base.py --lora / --msgdecoder /msgdecoder.pt --msg_gt

# 有图像攻击下的水印准确率评估
python run_eval_distortion.py --lora / --msgdecoder /msgdecoder.pt --msg_gt
2.3.2 生成图像质量评估
也是两个代码,分别是run_fid.py和run_dreamsim.py,分别计算两个图像质量指标FID和Dreamsim。
# 计算fid
python run_fid.py --lora / --prompt_file fid_outputs/coco/meta_data.json --gt_folder fid_outputs/coco/ground_truth

# 计算dreamsim
python run_dreamsim.py --lora / --output_dir output
三、代码解读😋
3.1 整体框架
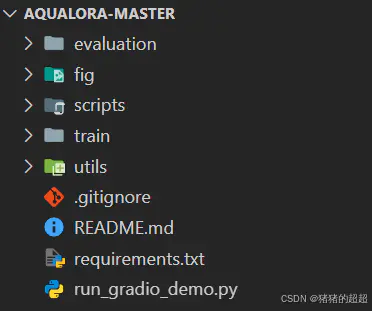
- 核心代码集中在train和evaluation文件夹中,顾名思义,一个是训练代码,一个是评估代码。
- scripts存储了一些脚本文件,主要是create_wm_lora.py起作用,用于生成特定水印比特串对应的水印LoRA权重文件。
- utils文件夹也比较重要,存储了水印编/解码器模型结构、模拟噪声层的结构以及实现一些功能的类和函数代码。
- 剩下的文件不那么重要,fig存储了论文算法框图、README.md是实验复现的指南、requirements.txt是python包安装文件、run_gradio_demo.py是基于Gradio库实现的网页demo。
3.2 训练代码
3.2.1 第一阶段训练(latent_wm_pretrain.py)

首先,我们来看各个模型的网络结构:包括VAE Encoder/Decoder、Secret Encoder/Decoder、Distortion Layer。
① VAE Encoder和VAE Decoder都是扩散模型中的一部分,代码表示如下:
vae = AutoencoderKL.from_pretrained(args.pretrained_model_name_or_path, subfolder="vae")

# VAE Encoder
latents = vae.encode(oimage).latent_dist.sample().detach()

# VAE Decoder
image = vae.decode(latents).sample
② Secret Encoder是作者参考RosteALS修改的,Secret Decoder使用预训练模型EfficientNet-B1进行微调。(这一块模型架构的定义在utils/models.py里面)
水印编码器如下所示:

class SecretEncoder(nn.Module):
    def __init__(self, secret_len, base_res=32, resolution=64) -> None:
        super().__init__()
        log_resolution = int(np.log2(resolution))
        log_base = int(np.log2(base_res))
        self.secret_len = secret_len
        self.secret_scaler = nn.Sequential(
            nn.Linear(secret_len, base_res*base_res),
            nn.SiLU(),
            View(-1, 1, base_res, base_res),
            Repeat(4, 1, 1),
            nn.Upsample(scale_factor=(2**(log_resolution-log_base), 2**(log_resolution-log_base))),  # chx16x16 -> chx256x256
            zero_module(conv_nd(2, 4, 4, 3, padding=1))
        )  # secret len -> ch x res x res

    def copy_encoder_weight(self, ae_model):
        # misses, ignores = self.load_state_dict(ae_state_dict, strict=False)
        return None

    def encode(self, x):
        x = self.secret_scaler(x)
        return x

    def forward(self, x, c):
        # x: [B, C, H, W], c: [B, secret_len]
        c = self.encode(c)
        c = F.interpolate(
            c, size=(x.shape[2], x.shape[3]), mode='bilinear'
        )
        x = x + c
        return x, c
水印解码器,主要微调的最后一层作为水印分类头:
class SecretDecoder(nn.Module):
    def __init__(self, output_size=64):
        super(SecretDecoder, self).__init__()
        self.output_size=output_size
        self.model = efficientnet.efficientnet_b1(weights=EfficientNet_B1_Weights.IMAGENET1K_V1)
        self.model.classifier[1] = nn.Linear(self.model.classifier[1].in_features, output_size*2, bias=True)

    def forward(self, x):
        x = F.interpolate(
            x, size=(512, 512), mode='bilinear'
        )
        decoded = self.model(x).view(-1, self.output_size, 2)
        return decoded
③ Distortion Layer用于模拟真实图片传输场景下的扰动或失真,以改善水印编解码器在真实情况下的嵌入效果。(这个噪声层主要在utilsnoise_layers里面定义)
class Noiser(nn.Module):
    """
    This module allows to combine different noise layers into a sequential noise module. The
    configuration and the sequence of the noise layers is controlled by the noise_config parameter.
    """
    def __init__(self, noise_layers: list, posibilities: list , device):
        super(Noiser, self).__init__()
        self.noise_layers = [Identity()]
        for layer in noise_layers:
            if type(layer) is str:
                if layer == 'Identity':
                    continue
                elif layer == 'Jpeg':
                    self.noise_layers.append(JpegCompression(device))
                elif layer == 'CropandResize':
                    self.noise_layers.append(CropandResize((256, 512), (256, 512)))
                elif layer == 'GaussianBlur':
                    self.noise_layers.append(GaussianBlur(10.0))
                elif layer == 'GaussianNoise':
                    self.noise_layers.append(GaussianNoise(0.2))
                elif layer == 'ColorJitter':
                    self.noise_layers.append(ColorJitter())
                else:
                    raise ValueError(f'Wrong layer placeholder string in Noiser.__init__().')
            else:
                self.noise_layers.append(layer)
        # self.noise_layers = nn.Sequential(*noise_layers)
        self.posibilities = posibilities

    def forward(self, encoded_and_cover, possibilites=None):
        # chose according to the probabilities
        random_noise_layer = np.random.choice(self.noise_layers, 1, p=self.posibilities if possibilites is None else possibilites)[0]
        return random_noise_layer(encoded_and_cover)
在讲完了每个层的结构后,我们结合这个训练框图,分析如何训练的,如何优化模型参数的。
输入图片,然后利用VAE Encoder将图片Io变成潜变量zo,而利用Secret Encoder将水印比特串变为潜变量,然后将二者进行相加得到带水印潜变量zw,将无水印潜变量zo和带水印潜变量zw都输入给VAE Decoder生成无水印图片Ir和带水印图片Iw,通过Ir和Iw之间的差异设计LPIPS和PRVL损失函数,减少水印对生成图像质量的影响,然后将Iw依次输入给模拟噪声层和水印解码器,解码恢复出水印比特串,比较恢复的水印比特串和原始的水印比特串,通过BCELoss进行优化,提高水印编/解码的准确率。
水印嵌入的核心代码(将图像潜变量zo和比特串潜变量进行相加,得到带水印的图像潜变量zw)
    def gen_combined_latents(latents, wm_latent, scale=1.0):
        cornerfy_aug = random.choice([True, False, False, False]) # 1/4 chance to cornerfy_aug

        height, width = wm_latent.shape[2], wm_latent.shape[3]
        height_scale, width_scale = (random.uniform(1.0, 2.0), random.uniform(1.0, 2.0)) if cornerfy_aug else (1.0, 1.0)
        if cornerfy_aug:
            wm_template = F.interpolate(torch.zeros_like(latents), scale_factor=(height_scale, width_scale), mode='bilinear') if cornerfy_aug else latents
            wm_template[:,:,:height//2, :width//2] =  wm_latent[:,:,:height//2, :width//2]
            wm_template[:,:,:height//2, -width//2:] = wm_latent[:,:,:height//2, -width//2:]
            wm_template[:,:,-height//2:,:width//2] =  wm_latent[:,:,-height//2:,:width//2]
            wm_template[:,:,-height//2:,-width//2:] = wm_latent[:,:,-height//2:,-width//2:]
            wm_template = F.interpolate(wm_template, size=(height, width), mode='bilinear')
        else:
            wm_template = wm_latent

        watermarked_latents = latents + wm_template * scale
        return watermarked_latents
其中PRVL损失函数是作者设计的,代码如下所示,主要计算局部的最大差异,以减少图像局部伪影:
def PRVL_loss(img1, img2):
    global KERNEL
    diff = torch.abs(img1 - img2)
    diff_combined = torch.mean(diff, dim=1, keepdim=True)
    if KERNEL.device != diff_combined.device:
        KERNEL = KERNEL.to(diff_combined.device)
    diff_sum = F.conv2d(diff_combined, KERNEL, padding=WINDOW_SIZE//2).squeeze(0) # [1, 513, 513]
    max_diff = torch.max(diff_sum)
    return max_diff
3.2.2 第二阶段训练(ppft_train.py)
这个代码是参考lora微调的代码进行修改得到。我们主要关注需要训练的mapper与水印LoRA模块,核心代码在损失函数的计算,其中水印LoRA模块请看3.4.1小节中的lora_modules.py。
由于这块损失函数的计算和lora微调的模块的代码太长了,还有一些工程代码,整个1200多行,因此在这不过多去粘贴代码。
mapper的结构定义如下(utils/model.py)
class MapperNet(nn.Module):
    def __init__(self, input_size=16, output_size=64, std=1.):
        super(MapperNet, self).__init__()
        self.input_size = input_size
        self.output_size = output_size
        self.bit_embeddings = nn.Embedding(
            input_size, output_size
        )
        init.orthogonal_(self.bit_embeddings.weight)
        self.bit_embeddings.weight.data = self.bit_embeddings.weight.data / self.bit_embeddings.weight.data.std(dim=1, keepdim=True)
        self.bit_embeddings.weight.data = self.bit_embeddings.weight.data * std

    def forward(self, x):
        pos_idx = torch.arange(self.input_size).long().to(x.device)
        encoded = self.bit_embeddings(pos_idx) # [48,224]
        encoded = encoded * x[:, :, None] # [4,48,224]
        encoded = encoded.sum(dim=1) / torch.sqrt(torch.tensor(self.input_size).float()) + 1.
        return encoded
额外进行鲁棒性增强微调的代码(rob_enhance_finetune.py),可以去问GPT来进行学习。
3.3 评估代码
3.3.1 无扰动下的水印解码准确率评估(run_eval_base.py)
这一块大多数代码行都是参数设置相关,核心代码其实在utils_eval.py里面:
def simple_decode(
        bitnum,
        msgdecoder_path,
        img_paths: List[str],
        msg_gt = None,
        resolution: int = 512,
        tpr_threshold: float = 1e-3
):
    msgdecoder = SecretDecoder(output_size=bitnum)
    msgdecoder.load_state_dict(torch.load(msgdecoder_path))
    device = "cuda" if torch.cuda.is_available() else "cpu"
    msgdecoder = msgdecoder.to(device)
    msgdecoder.eval()

    tau = get_threshold(bitnum, tpr_threshold) / bitnum

    def process(image):
        if not image.mode == "RGB":
            image = image.convert("RGB")
        image = image.resize((resolution, resolution), resample=Image.Resampling.BICUBIC)
        image = np.array(image).astype(np.uint8)
        image = (image / 127.5 - 1.0).astype(np.float32)
        image = torch.from_numpy(image).permute(2, 0, 1)
        return image

    results = []
    accuracy = []
    TP = 0
    FN = 0
    for image in tqdm(img_paths):
        # if image is not pil
        if not isinstance(image, Image.Image):
            image = Image.open(image)
        image = process(image)
        image = image.cuda()
        image = image.unsqueeze(0)

        # decode the message
        msg = msgdecoder(image)
        msg = torch.argmax(msg, dim=-1)
        msg = ''.join(map(str, msg.tolist()[0]))
        results.append(msg)
        # calculate bit accuracy between msg_gt and msg
        if msg_gt is not None:
            assert len(msg_gt) == len(msg)
            acc = sum([1 for i in range(len(msg)) if msg[i] == msg_gt[i]]) / len(msg)
            accuracy.append(acc)
            if acc >= tau:
                TP += 1
            else:
                FN += 1
    if msg_gt is not None:
        bitacc = np.mean(accuracy)
        TPR = TP / (TP + FN)
        print(f"bit accuracy: {bitacc}")
        print(f"TPR: {TPR}")

    return bitacc, TPR, results
3.3.2 扰动下的水印解码准确率评估(run_eval_distortion.py)
和3.3.1一样,核心的计算指标bitAccuracy和TPR@FPR都在utils_eval.py里面,但是多了一个图像攻击或扰动的模块,也是在utils_eval.py里面定义的,由apply_distorsion()函数实现。
def distorsion_unit(encoded_image,type):
    if type == 'color_jitter':
        distorted_image = K.augmentation.ColorJiggle(
                        brightness=(0.9,1.1),
                        contrast=(0.9,1.1),
                        saturation=(0.9,1.1),
                        hue=(-0.1,0.1),
                        p=1)(encoded_image)
    elif type == 'crop':
        distorted_image = crop(encoded_image)
    elif type == 'blur':
        distorted_image = K.augmentation.RandomGaussianBlur((3, 3), (4.0, 4.0), p=1.)(encoded_image)
    elif type == 'noise':
        distorted_image = K.augmentation.RandomGaussianNoise(mean=0.0, std=0.1, p=1)(encoded_image)
        distorted_image = torch.clamp(distorted_image, 0, 1)
    elif type == 'jpeg_compress':
        buffer = io.BytesIO()
        out = T.ToPILImage()(encoded_image.squeeze(0))
        out.save(buffer, format='JPEG', quality=50)
        buffer.seek(0)
        pil_image = Image.open(buffer)
        distorted_image = T.ToTensor()(pil_image)
    elif type == 'rotation':
        distorted_image = K.augmentation.RandomRotation(degrees=(15,15), p=1)(encoded_image)
    elif type == 'sharpness':
        distorted_image = K.augmentation.RandomSharpness(sharpness=10., p=1)(encoded_image)
    elif type == 'SDEdit':
        distorted_image = SDEdit(encoded_image)
    elif type == 'SDEdit2':
        distorted_image = SDEdit(encoded_image,version=2)
    else:
        raise ValueError(f'Wrong distorsion type in add_distorsion().')
    return distorted_image

def apply_distorsion(input_image_path, output_image_path, type):
    for path in tqdm(input_image_path):
        encoded_image = read_image(path, ImageReadMode.RGB).to(torch.float32) / 255
        encoded_image = encoded_image.cuda()
        distorted_image = distorsion_unit(encoded_image, type)

        distorted_image_path = os.path.join(output_image_path, type, os.path.basename(path))
        out = T.ToPILImage()(distorted_image.squeeze(0))
        out.save(distorted_image_path)
3.3.3 生成图像质量评估之FID(run_fid.py)
这一块就是分别让扩散模型和水印扩散模型生成图片,基于无水印生成图片和带水印生成图片,计算二者的FID。主要调包即可,实现代码在pytorch_fid里,由fid_score.py中的calculate_fid_given_paths()函数实现。
3.3.4 生成图像质量评估之Dreamsim(run_dreamsim.py)
和上面3.3.3一样,Dreamsim的指标也是调Python包直接计算就行。(实现代码在dreamsim/model.py里面的dreamsim()函数)
# 核心函数ds()
def ds(model, preprocess, set1, set2):
    image_set1 = sorted(glob.glob(f'{set1}/*.png'))
    image_set2 = sorted(glob.glob(f'{set2}/*.png'))
    assert len(image_set1) == len(image_set2)
    distances = []
    for i in tqdm(range(len(image_set1))):
        img1 = preprocess(Image.open(image_set1[i])).to("cuda")
        img2 = preprocess(Image.open(image_set2[i])).to("cuda")
        distance = model(img1, img2) # The model takes an RGB image from [0, 1], size batch_sizex3x224x224
        distances.append(distance)
    print(torch.mean(torch.stack(distances)))
    return torch.mean(torch.stack(distances)).item()

……

if __name__ == "__main__":

……
    model, preprocess = dreamsim(pretrained=True)

    image_set1 = sorted(glob.glob(f'{output_dir}/w/*.png'))
    image_set2 = sorted(glob.glob(f'{output_dir}/nw/*.png'))
    assert len(image_set1) == len(image_set2)

    ds(model, preprocess, f'{output_dir}/w', f'{output_dir}/nw')
3.4 其他代码
3.4.1 utils文件夹下的其他代码
① misc.py
这个代码主要是存储一些功能函数的杂项代码,torch_to_pil()实现将torch张量转换为PIL图像,get_cosine_schedule_with_warmup_lr_end()函数为学习率调度器,实现带预热的余弦学习率调度器。
② cschedulers.py
代码主要实现一个自定义的扩散模型调度器,class customDDPMScheduler(),它继承自扩散模型库Diffusers中的DDPMScheduler,用于扩展了原始DDPM调度器的功能。主要添加了三个方法:
- subtract_noise方法:从带噪声的样本中减去预测的噪声,恢复原始样本。
- get_sqrt_alpha_prod_div_sqrt_one_minus_alpha_prod方法:计算并返回sqrt(α_t)/sqrt(1-α_t)的值。
- velocity_to_eplison方法:将速度预测转换为噪声预测(epsilon)。
上述方法对于实现不同的扩散模型变体和采样策略很有用,尤其是在需要在噪声空间和图像空间之间进行转换的场景中,便于作者使用不同调度器的开展消融实验。
③ lora_modules.py
这个代码实现了水印LoRA模块,具体如下:
- 自定义LoRA前向传播函数:CustomLoRALinearLayerforward(为线性层定制的LoRA前向传播函数,支持张量形式的scale参数、CustomLoRAConv2dLayerforward(为卷积层定制的LoRA前向传播函数,支持张量形式的scale参数)。上述函数允许对不同通道应用不同的缩放因子S。
- 自定义兼容层:CustomLoRACompatibleConvforward和CustomLoRACompatibleLinearforward,为原始模型层添加LoRA功能的兼容层。
- 自定义LoRA加载器:CustomLoraLoaderMixin类继承自LoraLoaderMixin,提供了修改文本编码器的方法;_modify_text_encoder方法为文本编码器的注意力模块应用LoRA,包括对查询(q_proj)、键(k_proj)、值(v_proj)和输出(out_proj)投影的修改
scale是张量时,对于线性层会使用torch.diag_embed创建对角矩阵,对于卷积层则通过广播乘法应用到不同通道。
④ unet_keys.json
unet_keys.json是一个配置文件,包含了LoRA微调的UNet模型中所有层的路径列表,即UNet架构中所有需要应用LoRA的层的完整路径。
[
    "down_blocks.0.attentions.0.proj_in",
    "down_blocks.0.attentions.0.proj_out",
    "down_blocks.0.attentions.0.transformer_blocks.0.attn1.to_k",
    "down_blocks.0.attentions.0.transformer_blocks.0.attn1.to_out.0",
    "down_blocks.0.attentions.0.transformer_blocks.0.attn1.to_q",
    "down_blocks.0.attentions.0.transformer_blocks.0.attn1.to_v",
    "down_blocks.0.attentions.0.transformer_blocks.0.attn2.to_k",
    "down_blocks.0.attentions.0.transformer_blocks.0.attn2.to_out.0",
    "down_blocks.0.attentions.0.transformer_blocks.0.attn2.to_q",
    ……
3.4.2 scripts文件夹下的其他代码(重要❗)
实验复现主要用到了create_wm_lora.py代码,其用于将水印信息嵌入到LoRA权重中。
这个代码主要用于推理过程,包含了训练过程中有用的全部组件,因此也是理解AquaLoRA算法的出发点之一,我们可以基于推理过程及其输入输出来理解核心算法。
def create_watermark_lora(train_folder, scale, msg_bits=48, hidinfo=None, save=True):
    """
    创建带有水印的LoRA权重

    参数:
        train_folder: 训练好的LoRA模型所在的文件夹路径
        scale: 水印强度的缩放因子,控制水印的可见度和鲁棒性
        msg_bits: 水印消息的位数,默认为48位
        hidinfo: 自定义的水印二进制序列,如果为None则随机生成
        save: 是否保存生成的水印LoRA权重

    返回:
        hidinfo: 水印二进制序列的字符串表示
        c_lora_state_dict: 嵌入水印后的LoRA权重字典
    """
    # 加载原始LoRA权重文件到CPU内存
    lora_state_dict = load_file(f"{train_folder}/pytorch_lora_weights.safetensors", device='cpu')

    # 处理水印信息
    if hidinfo is None:
        # 如果没有提供水印信息,随机生成一个长度为msg_bits的二进制序列
        hidinfo = torch.randint(0, 2, (1, msg_bits))
    else:
        # 如果提供了水印信息,确保其长度正确,并将其转换为PyTorch张量
        assert len(hidinfo) == msg_bits
        hidinfo = torch.tensor([int(i) for i in hidinfo]).unsqueeze(0)
    hidinfo_ = hidinfo.float()  # 转换为浮点型,便于后续处理

    # 创建并加载MapperNet模型
    mapper = MapperNet(input_size=msg_bits, output_size=320)  # 创建映射网络,输出维度为320
    mapper.load_state_dict(torch.load(f"{train_folder}/mapper.pt"))  # 加载预训练的mapper权重
    mapped_loradiag = mapper(hidinfo_)  # 将水印信息映射到高维空间,得到映射后的向量

    # 创建新的权重字典,用于存储嵌入水印后的LoRA权重
    c_lora_state_dict = dict()

    # 遍历原始LoRA权重的所有键
    for key in lora_state_dict:
        if 'unet' in key:  # 只处理UNet部分的权重
            if 'attn' in key or 'ff' in key:  # 对于注意力层或前馈网络层的权重
                if 'up.weight' in key:  # 上投影权重保持不变
                    c_lora_state_dict[key] = lora_state_dict[key]
                elif 'down.weight' in key:  # 下投影权重嵌入水印
                    # 将映射后的水印向量转换为对角矩阵
                    mid = torch.diag_embed(mapped_loradiag)[0]
                    # 将对角矩阵与原始下投影权重相乘,并应用缩放因子
                    # 这是ASB结构中的S矩阵,实现水印嵌入
                    c_lora_state_dict[key] = mid @ lora_state_dict[key] * scale

            if 'proj_in' in key or 'proj_out' in key:  # 对于输入输出投影层的权重
                if 'up.weight' in key:  # 上投影权重保持不变
                    c_lora_state_dict[key] = lora_state_dict[key]
                elif 'down.weight' in key:  # 下投影权重嵌入水印
                    mid = mapped_loradiag[0]  # 直接使用映射后的水印向量
                    # 通过广播将水印应用到卷积权重的每个通道
                    # [:, None, None, None]扩展维度以匹配卷积权重的形状
                    c_lora_state_dict[key] = lora_state_dict[key] * mid[:, None, None, None] * scale

        elif 'text_encoder' in key:  # 忽略文本编码器部分的权重
            pass
        else:  # 如果遇到未知类型的键,抛出错误
            raise ValueError(f"key {key} not found")

    # 将水印二进制张量转换回字符串形式,便于文件命名和输出
    hidinfo = ''.join(map(str, hidinfo.tolist()[0]))

    # 保存嵌入水印后的LoRA权重
    if save:
        # 创建以水印二进制序列命名的子文件夹
        if not os.path.exists(f"{train_folder}/{hidinfo}"):
            os.makedirs(f"{train_folder}/{hidinfo}")
        # 将嵌入水印后的LoRA权重保存到该文件夹中
        safetensors.torch.save_file(c_lora_state_dict, f"{train_folder}/{hidinfo}/pytorch_lora_weights.safetensors")

    # 返回水印二进制序列和嵌入水印后的LoRA权重字典
    return hidinfo, c_lora_state_dict
create_watermark_lora()通过修改LoRA权重中的缩放矩阵来嵌入水印,而不需要重新训练模型。这种方法允许用户在推理时动态更改水印信息,同时保持生成图像的质量。
四、学习收获✍
4.1 关于代码结构
个人感觉整个这篇论文实现的代码结构很清晰,值得学习和参考。
比如train文件夹下都是训练相关代码,evaluation文件夹下都是模型评估相关,utils文件夹下存一些模型结构(如水印编/解码器、模拟的噪声层等)和杂项代码,而scripts文件夹存一些脚本的代码,比如实现水印lora权重合并的代码
4.2 解决了一些工程问题
4.2.1 服务器没有魔法就只能本地下载预训练模型了吗?可以hf-mirror!
pip install huggingface_hub

# 这个export也可以放到.bashrc里面作为环境变量
export HF_ENDPOINT="https://hf-mirror.com"

# 请在hf官方先开一个Access Tokens:https://huggingface.co/settings/tokens
huggingface-cli login

# 下载模型
huggingface-cli download --resume-download teknium/OpenHermes-2.5-Mistral-7B --local-dir-use-symlinks False --local-dir  OpenHermes-2.5-Mistral-7B

# 下载数据集
huggingface-cli download --repo-type dataset --resume-download wikitext --local-dir ./wikitext
4.2.2 Pytorch dataloader 错误 “DataLoader worker (pid xxx) is killed by signal” 解决方法
在复现代码AquaLoRA的时候,进行PPFT(先验保留微调)的时候,第二阶段训练报错如下:
RuntimeError: DataLoader worker (pid 178002) is killed by signal: Bus error. It is possible that datalo
ader’s workers are out of shared memory. Please try to raise your shared memory limit.
主要问题在于:共享内存太小了!
1、共享内存不足:
RuntimeError: DataLoader worker (pid XXX) is killed by signal: Bus error
2、多线程出现段错误导致死锁,进而导致程序卡住,线程阻塞:
ERROR: Unexpected segmentation fault encountered in worker.
我的解决方案:共享内存不够,就增加共享内存!
通过指令 mount -o remount,size=30G /dev/shm 增加默认共享内存就可以了~
总结🎉
本篇博客详细为读者讲解了aqualora方法的代码,从实验复现到代码精读,结合两阶段训练的算法框图,结合实现代码进行解读,为做模型水印的研究者们提供了参考和思路。
文章来源于互联网:代码精读-AquaLoRA: Toward White-box Protection for Customized Stable Diffusion Models via Watermark LoRA